Hyundai i-30: Tail Gate / Tail Gate Lift
Hyundai i30 (PD) 2018-2025 Service Manual / Body (Interior and Exterior) / Tail Gate / Tail Gate Lift
Repair procedures
| Replacement |
|

| 1. |
Using a screwdriver, lift up slightly the socket clips (A) of both ends
on the lifter (B), and then remove the lifter from the bracket.
|

| 2. |
Push the socket of the lifter into the bracket for installation.
|
 Tail Gate Latch
Components and components location
Component Location
1. Tail Gate
latch assembly
Repair procedures
Replacement
•
Put on gloves to prevent hand injuries...
 Tail Gate Weatherstrip
Repair procedures
Replacement
1.
Remove the tail gate weatherstrip (A).
•
Do not apply sealant to the body...
Other information:
Hyundai i30 (PD) 2018-2025 Service Manual: General information
General Troubleshooting Information Before Troubleshooting 1. Check applicable fuses in the appropriate fuse/relay box. 2. Check the battery for damage, state of charge, and cleanness and tight connections...
Hyundai i30 (PD) 2018-2025 Service Manual: Turbo Charger & Exhaust Manifold
Components and components location Components 1. Catalytic converter (WCC) 2. Turbo manifold module 3. Catalytic converter (WCC) heat protector 4. Turbo charger gasket 5. Catalytic converter (WCC) gasket 6...
Categories
- Manuals Home
- 3rd Generation i30 Owners Manual
- 3rd Generation i30 Service Manual
- Theft-alarm system
- Light bulbs
- Trip computer
- New on site
- Most important about car
Power windows
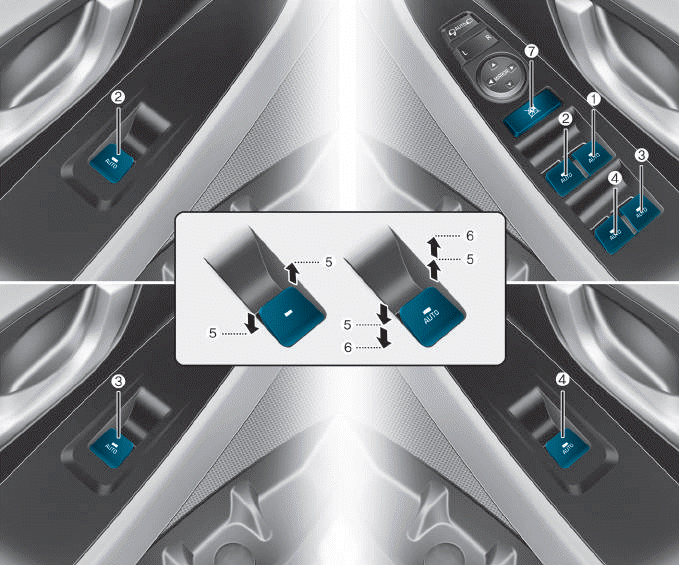
(1) Driver’s door power window
switch
(2) Front passenger’s door power
window switch
(3) Rear door (right) power window
switch
(4) Rear door (left) power window
switch
(5) Window opening and closing
(6) Automatic power window
(7) Power window lock switch

Copyright © 2025 www.hi30.net