Hyundai i-30: Tail Gate / Tail Gate Weatherstrip
Hyundai i30 (PD) 2018-2025 Service Manual / Body (Interior and Exterior) / Tail Gate / Tail Gate Weatherstrip
Repair procedures
| Replacement |
| 1. |
Remove the tail gate weatherstrip (A).
|
| 2. |
To install, reverse removal procedure.
|
 Tail Gate Lift
Repair procedures
Replacement
•
Take care to not let the tail gate fall on you as the lifts
are removed...
Other information:
Hyundai i30 (PD) 2018-2025 Service Manual: Fuel Line
Repair procedures Removal 1. Turn the ignition switch OFF and disconnect the battery (-) terminal. 2. Release the residual pressure in fuel line. (Refer to Fuel Delivery System - "Release Residual Pressure in Fuel Line") 3...
Hyundai i30 (PD) 2018-2025 Owner's Manual: Master Warning Light. Low Tyre Pressure Warning Light. Fuel Filter Warning Light (for diesel engine)
Master Warning Light This indicator light illuminates: • When there is a malfunction in the below systems. - Low washer fluid (if equipped) - Exterior lamp malfunction (if equipped) - HBA (High Beam Assist) malfunction (if equipped) - BCW (Blind-Spot Collision Warning) malfunction (if equipped) - FCA (Forward Collision- Avoidance Assist) malfunction (if equipped) - ISLW (Intelligent Speed Limit Warning) malfunction (if equipped) - SCC (Smart Cruise Control) malfunction (if equipped) - Tyre Pressure Monitoring System (TPMS) To identify the details of the warning, look at the LCD display...
Categories
- Manuals Home
- 3rd Generation i30 Owners Manual
- 3rd Generation i30 Service Manual
- Drive mode integrated control system
- Trip computer
- Exhaust System (DPF) Warning Light. Glow Indicator Light
- New on site
- Most important about car
Bonnet
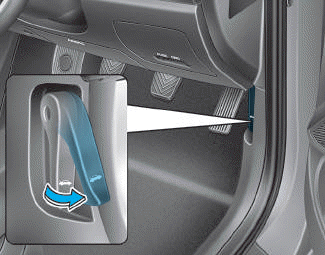
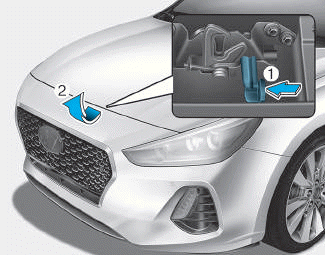
Opening the bonnet

1. Park the vehicle and set the parking brake.
2. Pull the release lever to unlatch the bonnet. The bonnet should pop open slightly.

Copyright © 2025 www.hi30.net


