Hyundai i-30: Airbag Module / Passenger Airbag (PAB) Module
Hyundai i30 (PD) 2018-2025 Service Manual / Restraint / Airbag Module / Passenger Airbag (PAB) Module
Components and components location
| Components |

| 1. Passenger
Air Bag (PAB) |
Description and operation
| Description |
The passenger airbag (PAB) is installed inside the crash pad and protects the
front passenger in the event of a frontal crash. The SRSCM determines if and
when to deploy the PAB.
|

Repair procedures
| Removal |
| 1. |
Disconnect the battery negative cable and wait for at least three minutes
before beginning work.
|
| 2. |
Remove the glove box housing.
(Refer to Body - "Glove Box Upper Cover Assembly")
|
| 3. |
Remove the passenger airbag mounting bolts.
|
| 4. |
Disconnect the passenger airbag connector (A).
|

| 5. |
Remove the crash pad.
(Refer to Body - "Main Crash Pad Assembly")
|

| 6. |
Remove the mounting bolts from the crash pad. And then remove the passenger
airbag.
|

| Installation |
| 1. |
Remove the ignition key from the vehicle.
|
| 2. |
Disconnect the battery negative cable from battery and wait for at least
three minutes before beginning work.
|
| 3. |
Place the passenger airbag on the crash pad and tighten the passenger
airbag mounting nuts.
|
| 4. |
Install the crash pad.
(Refer to Body - "Main Crash Pad Assembly")
|
| 5. |
Tighten the passenger airbag crash pad mounting bolts.
|
| 6. |
Connect the passenger airbag harness connector to the SRS main harness
connector (A).
|
| 7. |
Reinstall the glove box.
(Refer to Body - "Crash Pad Center Panel")
|
| 8. |
Reconnect the battery negative cable.
|
| 9. |
After installing the passenger airbag (PAB), confirm proper system operation
:
|
 Driver Airbag (DAB) Module and Clock Spring
Components and components location
Components
1. Driver Air
Bag (DAB)
2. Steering Wheel
3. Clock Spring
Description and operation
Description
•
Driver Air Bag (DAB)
DAB is installed in the steering wheel, and electrically connected to
the SRSCM via clock spring...
 Side Airbag (SAB) Module
Components and components location
Components
1. Side Air Bag
(SAB)
Description and operation
Description
The Side Airbags (SAB) are installed inside the front seat and protects the
driver and passenger from danger when side crash occurs...
Other information:
Hyundai i30 (PD) 2018-2025 Owner's Manual: Exhaust emission control system
The Exhaust Emission Control System is a highly effective system which controls exhaust emissions whilst maintaining good vehicle performance. Vehicle modifications This vehicle should not be modified. Modification of your vehicle could affect its performance, safety or durability and may even violate governmental safety and emissions regulations...
Hyundai i30 (PD) 2018-2025 Service Manual: Master Cylinder
Components and components location Components [LHD] 1. Reservoir cap 2. Reservoir 3. Brake booster 4. Master cylinder 5. Push rod [RHD] 1. Reservoir cap 2...
Categories
- Manuals Home
- 3rd Generation i30 Owners Manual
- 3rd Generation i30 Service Manual
- To activate the ISG system
- FCA sensor
- Brake/clutch fluid
- New on site
- Most important about car
Turn signals and lane change signals
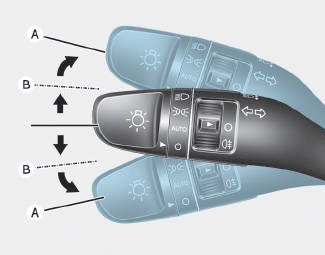
To signal a turn, push down on the lever for a left turn or up for a right turn in position (A). To signal a lane change, move the turn signal lever slightly and hold it in position (B).The lever will return to the OFF position when released or when the turn is completed.

Copyright © 2025 www.hi30.net