Hyundai i-30: Rear Door / Rear Door Window Glass
Hyundai i30 (PD) 2018-2025 Service Manual / Body (Interior and Exterior) / Rear Door / Rear Door Window Glass
Components and components location
| Component Location |
| 1. Rear door
window glass |
Repair procedures
| Replacement |
| 1. |
Remove the rear door trim.
(Refer to Rear Door - "Rear Door Trim")
|
| 2. |
Remove the front door belt outside weatherstrip (A).
|
| 3. |
After loosening the mounting screws, remove the Rear door delta molding
(A).
|

| 4. |
Remove the rear door belt inside weatherstrip (A).
|
| 5. |
Slightly push the rear door channel in the direction of arrow as below.
|

| 6. |
Remove the rear door window glass mounting hole plug (A).
|


| 7. |
Carefully adjust the rear door window glass (A) until the bolts are
visible, then loosen them. Separate the glass from the glass run and
carefully pull the glass out through the window slot.
|
| 8. |
To install, reverse removal procedure.
|
 Rear Door Inside Handle
Repair procedures
Replacement
1.
Remove the rear door trim.
(Refer to Rear Door - "Rear Door Trim")
2...
 Rear Door Module
Components and components location
Component Location
1. Rear door
module
Repair procedures
Replacement
1...
Other information:
Hyundai i30 (PD) 2018-2025 Service Manual: Components and components location
..
Hyundai i30 (PD) 2018-2025 Owner's Manual: Rear window wiper and washer switch
The rear window wiper and washer switch is located at the end of the wiper and washer switch lever. Turn the switch to the desired position to operate the rear wiper and washer. 2 – High wiper speed 1 – Low wiper speed O – Off Push the lever away from you to spray rear washer fluid and to run the rear wipers 1~3 cycles...
Categories
- Manuals Home
- 3rd Generation i30 Owners Manual
- 3rd Generation i30 Service Manual
- Drive mode integrated control system
- Engine compartment
- Front windscreen wiper service position
- New on site
- Most important about car
Air bag - supplemental restraint system
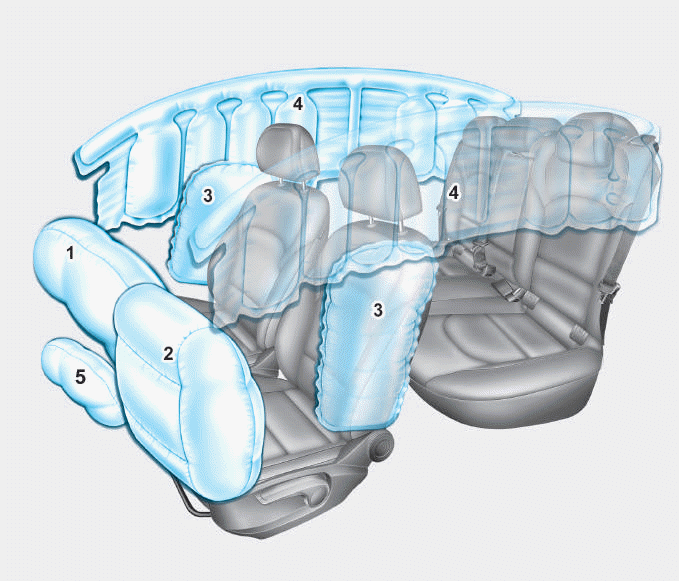
1. Driver’s front air bag
2. Passenger’s front air bag
3. Side air bag*
4. Curtain air bag*
5. Knee air bag*
6. Front passenger air bag ON/OFF
switch

Copyright © 2025 www.hi30.net