Hyundai i-30: Rear Bumper / Rear Bumper beam Assembly
Components and components location

1. Rear bumper
beam assembly
|
|
Repair procedures
| •
|
Put on gloves to prevent hand injuries.
|
|
| •
|
When removing with a flat-tip screwdriver or remover, wrap protective
tape around the tools to prevent damage to components.
|
| •
|
When removing the interior trim pieces, use a plastic panel
removal tool not to damage the surface.
|
| •
|
Take care not to bend or scratch the trim and panels.
|
|
|
1. |
Remove the rear bumper assembly.
(Refer to Rear Bumper - "Rear Bumper Assembly")
|
|
2. |
Disconnect the rear bumper beam mounting wiring harness (A).

|
|
3. |
Loosen the mounting screws and remove the smart key antenna (A).

|
|
4. |
After loosening the mounting clips, remove the rear bumper beam assembly
(A).

|
|
5. |
To install, reverse removal procedure.
|
• |
Make sure the connector is plugged in properly.
|
|
• |
Replace any damaged clips (or pin-type retainers).
|
|
|
Components and components location
Component Location
1. Rear bumper
assembly
Repair procedures
Replacement
•
Put on gloves to prevent hand injuries...
Other information:
Repair procedures
Hub nut tightening sequence
1.
Tighten the hub nuts as follows.
Tightening torque :
107.9 - 127.5 N.m (11.0 - 13.0 kgf.m, 79.6 - 94.0 lb-ft)
•
When using an impact gun, final tightening torque should
be checked using a torque wrench...
The Driver Attention Warning (DAW)
system displays the condition of the
driver's fatigue level and inattentive
driving practices.
System setting and activation
System setting
The Driver Attention Warning
(DAW) system is set to be in the
OFF position, when your vehicle is
first delivered to you from the factory...
Categories
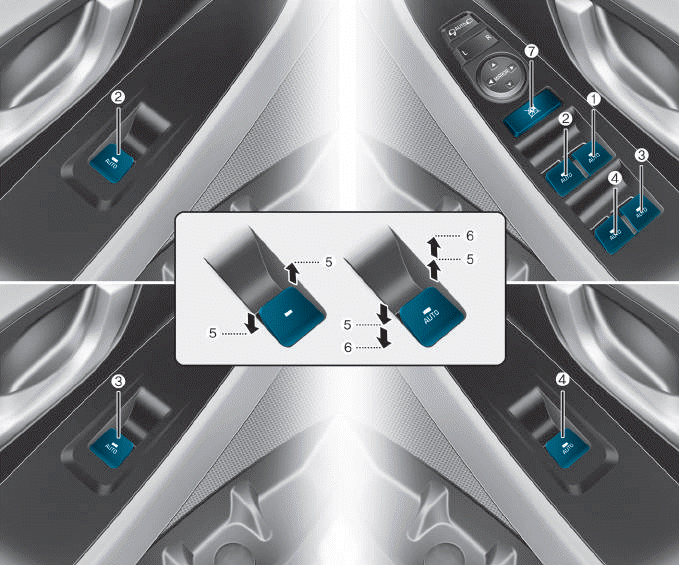
(1) Driver’s door power window
switch
(2) Front passenger’s door power
window switch
(3) Rear door (right) power window
switch
(4) Rear door (left) power window
switch
(5) Window opening and closing
(6) Automatic power window
(7) Power window lock switch
read more


 Rear Bumper Assembly
 Front Seat