Hyundai i-30: Dual Clutch Transmission Assembly / Transmission Gear Oil
General information
|
1. |
Check & Change intervals
Check & Replenishmen
|
Change
|
Capacity
|
Oil specification
|
Normal Use
|
Severe Use
|
No check
|
No service required
|
120000 km
(80000 miles)
|
1.6 - 1.7L
(0.42 - 0.45 U.S.gal., 1.69 - 1.80 U.S. qt., 1.41 - 1.50 lmp qt)
|
API Service GL-4, SAE 70W
• Recommended oil
|
– |
H.K.SHELL : SPIRAX S6 GHDE 70W DCTF PLUS
|
|
– |
SK : HK D DCTF TGO-10 PLUS
|
|
|
Severe usage is defined as
|
• |
Frequent driving on rough road (Bumpy road, gravel road,
snow road, unpaved road. etc.)
|
|
• |
Frequent driving on mountain road, ascent/descent.
|
|
• |
Driving for patrol, taxi, commercial car or vehicle
towing.
|
|
• |
Frequent driving under high speed (over 170km)
|
|
• |
More than 50% driving in heavy city traffic during hot
weather above 32°C (90°F)
|
|
• |
driving in areas using salt or other corrosive materials
or in very cold weather.
|
|
• |
Towing a trailer or using a camper on roof rack.
|
|
• |
Manual transmission oil should be changed any time.
Manual transmission have been submerged in water.
|
|
|
Repair procedures
| •
|
In principle, the transmission oil is maintenance-free, and
no exchange is required.
|
|
|
1. |
Uplift the vehicle with lift.
|
|
2. |
Remove the under cover.
(Refer to Engine Mechanical System - "Engine Room Under Cover")
|
|
3. |
Loosen the oil filler plug (A).

|
|
4. |
Check the oil level.
|
• |
For the accuracy, inspect the oil level after the oil
is completely drained.
|
|
• |
Loosen the drain plug (A) and wait for over 10 minutes
until the oil is drained enough.
|
|
• |
Install the drain plug (A) after drain the oil.
|
|
• |
After the inspection, inject the oil through the filler
plug hole according to the specification.
(Specified fluid : 1.6 - 1.7L (0.42 - 0.45 U.S.gal.,
1.69 - 1.80 U.S. qt., 1.41 - 1.50 lmp qt)
|
|
• |
While draining, some of the oil flows into the transmission
part and the oil may be less than the specification
by 0.1 - 0.15 L (0.03 - 0.04 U.S.gal., 0.10 - 0.16 U.S.
qt., 0.09 - 0.13 lmp qt.) This is normal and additional
oil injection is not required.

|
|
|
|
5. |
Install the filler plug (A) with new gasket.
|
Tightening torque :
58.9 - 78.5 N.m (6.0 - 8.0 kgf.m, 43.4 - 57.8 lb-ft)
|

|
|
6. |
Install the under cover.
(Refer to Engine Mechanical System - "Engine Room Under Cover")
|
|
In principle, the Dual Clutch Transmission (DCT) oil is not changed
under normal driving conditions.
However, under harsh driving conditions, it must be changed every 80,000
miles.
Harsh driving conditions are as follows:
| •
|
Frequent driving on rough road (Bumpy road, gravel road, snow
road, unpaved road. etc.)
|
| •
|
Frequent driving on mountain road, ascent/descent.
|
| •
|
Driving for patrol, taxi, commercial car or vehicle towing.
|
| •
|
Frequent driving under high speed (over 170km)
|
| •
|
More than 50% driving in heavy city traffic during hot weather
above 32°C (90°F)
|
| •
|
driving in areas using salt or other corrosive materials or
in very cold weather.
|
| •
|
Towing a trailer or using a camper on roof rack.
|
| •
|
Manual transmission oil should be changed any time.
Manual transmission have been submerged in water.
|
|
|
1. |
Remove the under cover.
(Refer to Engine Mechanical System - "Engine Room Under Cover")
|
|
2. |
Remove the drain plug (A) and drain all the oil. Then install the drain
plug with a new gasket.
|
Tightening torque :
44.1 ~ 48.8 N.m (4.5 ~ 6.0 kgf.m, 32.5 ~ 43.4 lb-ft)
|

|
|
3. |
Add new oil through the filler plug hole (A) and, fill it just below
the plug opening.
|
Standard oil :
API Service GL-4, SAE 70W
Recommnend oil:
H.K.SHELL : SPIRAX S6 GHDE 70W DCTF PLUS, SK : HK D DCTF TGO-10
PLUS
Oil capacity :
1.6 - 1.7L (0.42 - 0.45 U.S.gal., 1.69 - 1.80 U.S. qt., 1.41
- 1.50 lmp qt)
|

|
|
4. |
Install the filler plug bolt (A) with new gasket.
|
Tightening torque :
58.9 ~ 78.5 N.m (6.0 ~ 8.0 kgf.m, 43.4 ~ 57.8 lb-ft)
|
|
|
5. |
Install the under cover.
(Refer to Engine Mechanical System - "Engine Room Under Cover")
|
Components and components location
Components
1. DCT (Dual
Clutch Transmission) assembly
2. DCT support bracket
3...
Other information:
Cancelled manually
Depressing the brake pedal.
Pressing the button located on
the steering wheel.
The Smart Cruise Control turns off
temporarily when the Set Speed and
Vehicle-to-Vehicle Distance indicator
on the LCD display turns off...
Description and operation
The System may be limited when
•
The radar sensor or camera is blocked with a foreign object
or debris...
Categories
Operating door locks from
outside the vehicle
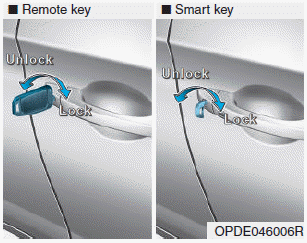
Mechanical key

Turn the key toward the rear of the
vehicle to unlock and toward the front
of the vehicle to lock.
If you lock/unlock the driver's door
with a key, a driver’s door will
lock/unlock automatically.
read more
 DCT (Dual Clutch Transmission)


