Hyundai i-30: Clutch Master Cylinder / Repair procedures
|
1. |
Turn OFF ignition switch and disconnect the negative (-) battery cable.
|
|
2. |
Remove the clutch master cylinder.
| 1) |
Separate the push rod (A).

|
| 2) |
Separate the reservoir hose (A).
|
| 3) |
Remove the snap pin (B) and then separate the regulator and
clutch tube (C) at the same time.
|
• |
Do not spill brake fluid on the vehicle it may
damage the paint if brake fluid does contact
the paint, wash it off immediately with water.
|
|

|
| 4) |
Remove the master cylinder (A) by turning it clockwise.

|
| 5) |
Disconnect the clutch stroke sensor connector (A). [In case
of ISG or EPB system]

|
|
|
1. |
Turn OFF ignition switch and disconnect the negative (-) battery cable.
|
|
2. |
Remove the clutch master cylinder.
| 1) |
Separate the push rod (A).
|
| 2) |
Separate the reservoir hose (A).
|
• |
Do not spill brake fluid on the vehicle it may
damage the paint if brake fluid does contact
the paint, wash it off immediately with water.
|
|

|
| 3) |
Remove the snap pin (A) and then separate the clutch tube (B).

|
| 4) |
Remove the master cylinder (A) by turning it clockwise.
|
| 5) |
Disconnect the clutch stroke sensor connector (A). [In case
of ISG or EPB system]
|
|
|
1. |
Remove the clutch master cylinder.
| 1) |
Separate the push rod (A).
|
| 2) |
Separate the reservoir hose (A).
|
| 3) |
Remove the snap pin (B) and then separate the regulator and
clutch tube (C) at the same time.

|
• |
Do not spill brake fluid on the vehicle it may
damage the paint if brake fluid does contact
the paint, wash it off immediately with water.
|
|
|
| 4) |
Remove the master cylinder (A) by turning it clockwise.
|
| 5) |
Disconnect the clutch stroke sensor connector (A). [In case
of ISG or EPB system]
|
|
|
1. |
To install, reverse the removal procedures.
|
|
2. |
Perform bleeding air procedure in concentric slave cylinder after pouring
the brake fluid.
(Refer to Clutch System - "Concentric Slave Cylinder Assembly")
|
Components
[ISG or EPB Apply Type]
1. Clutch pedal
2. Clutch master cylinder
3. Stroke sensor
[ISG or EPB None Apply Type]
1...
Other information:
Type A
Type B
(1) Headlamp (High)
(2) Headlamp (Low)
(3) Turn signal lamp
(4) Daytime running light
(if equipped)
(5) Position lamp
(6) Static bending light
WARNING
Handle halogen bulbs with
care. Halogen bulbs contain
pressurized gas that will produce
flying pieces of glass that
could cause injuries if broken...
..
Categories
Operating door locks from
outside the vehicle
Mechanical key
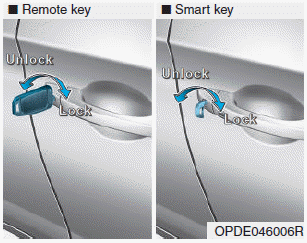
Turn the key toward the rear of the
vehicle to unlock and toward the front
of the vehicle to lock.
If you lock/unlock the driver's door
with a key, a driver’s door will
lock/unlock automatically.
read more

 Components and components location
