Hyundai i-30: Brake System / Rear Disc Brake
Components and components location
| Components |
| [With EPB] |

| 1. Caliper body 2. Guide rod pin 3. Guide rod pin boot 4. Caliper carrier |
5. Pad retainer 6. Brake pad 7. Pad return spring 8. EPB actuator |
| [Without EPB] |

| 1. Brake pad 2. Pad return spring 3. Caliper carrier 4. Pad retainer 5. Caliper body |
6. Return spring 7. Stopper 8. Operating lever 9. Bleed screw |
Repair procedures
| Removal |
[With EPB]
| 1. |
Loosen the wheel nuts slightly.
Raise the vehicle, and make sure it is securely supported.
|
| 2. |
Remove the rear wheel and tire (A) from the rear hub.
|
| 3. |
Release the EPB, push the EPB switch or using diagnostic tool.
(Refer to Paking brake - "Electric Parking Brake")
|
| 4. |
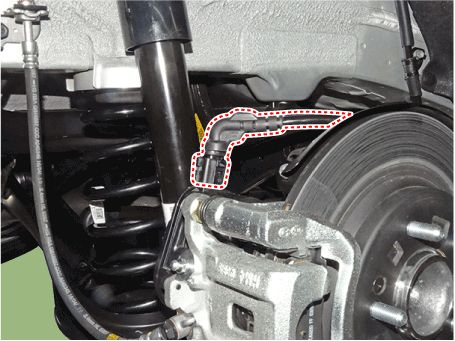
Disconnect the EPB connector.
|
| 5. |
Remove the brake hose by loosening the bolt (A).
|
| 6. |
Loosen the guide rod bolt and then remove the caliper body.
|
| 7. |
Remove the pad return spring (A).
|
| 8. |
Remove the brake pad.
|
| 9. |
Remove the pad retainer (A).
|
| 10. |
Loosen the caliper mounting bolts and then remove the rear caliper assembly.
|
| 11. |
Remove the rear brake disc by loosening the screws.
|
[Without EPB]
| 1. |
Loosen the wheel nuts slightly.
Raise the vehicle, and make sure it is securely supported.
|
| 2. |
Remove the rear wheel and tire (A) from the rear hub.
|
| 3. |
Remove the parking brake cable fixed clip (A).
|
| 4. |
Pull the operation lever as a arrow in the illustration below and then
remove the parking cable.
|
| 5. |
Loosen the guide rod bolts and then down the caliper body.
|
| 6. |
Remove the pad return spring (A).
|
| 7. |
Remove the brake pad.
|
| 8. |
Remove the pad retainer and then remove the rear caliper.
|
| 9. |
Remove the rear brake disc by loosening the screws.
|
| Replacement |
[With EPB]
| 1. |
Loosen the wheel nuts slightly.
Raise the vehicle, and make sure it is securely supported.
|
| 2. |
Remove the rear wheel and tire (A) from the rear hub.
|
| 3. |
Release the EPB, push the EPB switch or using diagnostic tool.
(Refer to Paking brake - "Electric Parking Brake")
|
| 4. |
Disconnect the EPB connector.
|
| 5. |
Loosen the guide rod bolt and then remove the caliper body.
|
| 6. |
Remove the pad return spring (A).
|
| 7. |
Remove the brake pad.
|
| 8. |
Remove the pad retainer (A).
|
| 9. |
Replace the brake pad and pad retainer with a new one.
|
| 10. |
Install the pad return spring (A).
|
| 11. |
Install the caliper body (A) then tighten the guide rod bolt (B).
|
| 12. |
Install the wheel and tire (A).
|
[Without EPB]
| 1. |
Loosen the wheel nuts slightly.
Raise the vehicle, and make sure it is securely supported.
|
| 2. |
Remove the rear wheel and tire (A) from the rear hub.
|
| 3. |
Remove the parking brake cable fixed clip (A).
|
| 4. |
Pull the operation lever as a arrow in the illustration below and then
remove the parking cable.
|
| 5. |
Loosen the guide rod bolt and then down the caliper body.
|
| 6. |
Remove the pad return spring (A).
|
| 7. |
Replace the brake pad and pad retainer with a new one.
|
| 8. |
Install the pad return spring (A).
|
| 9. |
Install the caliper body then tighten the guide rod bolt.
|
| 10. |
Install the wheel and tire (A).
|
| Inspection |
| Rear Brake Disc Thickness Check |
| 1. |
Check the brake pads for wear and fade.
|
| 2. |
Check the brake disc for damage and cracks.
|
| 3. |
Remove all rust and contamination from the surface, and measure the
disc thickness at 24 points, at least, of same distance (5mm) from the
brake disc outer circle.
|
| 4. |
If wear exceeds the limit, replace the discs and pad assembly left and
right of the vehicle.
|
| Rear Brake Pad Check |
| 1. |
Check the pad wear. Measure the pad thickness and replace it, if it
is less than the specified value.
|
| 2. |
Check the damage of pad, backing metal and contamination with grease.
|
| Rear Brake Disc Runout Check |
| 1. |
Place a dial gauge about 10mm (0.2 in.) from the outer circumference
of the brake disc, and measure the runout of the disc.
|
| 2. |
If the runout of the brake disc exceeds the limit specification, replace
the disc, and then measure the runout again.
|
| 3. |
If the runout exceeds the limit specification, install the brake disc
after turning it 180° and then check the runout of the brake disc again.
|
| 4. |
If the runout cannot be corrected by changing the position of the brake
disc, replace the brake disc.
|
| Installation |
| 1. |
To install, reverse the removal procedure.
|
| 2. |
When istalling, press and rotate the piston into the caliper body until
it is fully retracted.
|
| 3. |
After installing, bleed the brake system.
(Refer to Brake System - "Brake System Bleeding")
(Refer to Brake System - "ABS System Bleeding")
(Refer to Brake System - "ESP System Bleeding")
|
| Parking Brake Adjustment |
|
| 1. |
Remove the floor console to reach the adjusting nut.
|
| 2. |
Loosen the parking brake cable until both operating levers rest in fully
off position.
|
| 3. |
Bring the brake pads in their operating position by pressing the brake
pedal down several times until there is resistance.
|
| 4. |
Tension the parking brake cable by tightening the adjusting nut, until
the operating levers on both calipers lift from the stop, up to a distance
of (A) and (D) between operating lever (B) and stopper (C).
|
| 5. |
Refit the floor console.
|
| 6. |
Parking brake lever in the car must be in fully loosened position.
|
| 7. |
If the handbrake cables where changed, actuate the parking brake a few
times with maximum force to stretch the parking brake cables, and then
control adjusting as above.
|
| 8. |
Check the wheels of their free operation.
|
| 9. |
Test drive.
|
 Front Disc Brake
Components and components location
Components
1. Caliper body
2. Guide rod pin
3. Guide rod pin boot
4. Caliper carrier
5...
 Stop Lamp Switch
Components and components location
Components
1. Brake member
assembly
2. Stop lamp switch
3. Return spring
4...
Other information:
Hyundai i30 (PD) 2018-2025 Service Manual: Repair procedures
Adjustment Glass Adjustment • Check the glass run channel for damage or deterioration, and replace it if necessary...
Hyundai i30 (PD) 2018-2025 Service Manual: Components and components location
..
Categories
- Manuals Home
- 3rd Generation i30 Owners Manual
- 3rd Generation i30 Service Manual
- Engine compartment
- Brake/clutch fluid
- EPB malfunction indicator
- New on site
- Most important about car
Gauges and meters
Speedometer

The speedometer indicates the speed of the vehicle and is calibrated in kilometers per hour (km/h) and/or miles per hour (MPH).
Tachometer

Copyright © 2025 www.hi30.net


