Hyundai i-30: Seat Belt Pretensioner / Emergency Fastening Device (EFD)
Hyundai i30 (PD) 2018-2025 Service Manual / Restraint / Seat Belt Pretensioner / Emergency Fastening Device (EFD)
Components and components location
| Components |

| 1. EFD (Emergency
Fastening Device) System |
Description and operation
| Description |
The Emergency Fastening Device (EFD) operates at the same time with the Seat
Belt Pretensioner when it satisifies the deployment condition after a collision.
It is an auxiliary equipment to prevent a driver and passenger from breaking
away by pulling the seat belt toward the anchor side after a collision. It is
located near the anchor on the driver and passenger seat and is supported by
two cables.
|

Repair procedures
| Removal |
| 1. |
Disconnect the battery negative cable and wait for at least 3 minutes
before beginning work.
|
| 2. |
Remove the front seat.
(Refer to Body - "Front Seat Assembly")
|
| 3. |
Remove the front seat.
(Refer to Body - "Rear Seat Assembly")
|
| 4. |
Remove the upper anchor bolt.
|

| 5. |
Remove the Rear door scuff trim.
(Refer to Body - "Door Scuff Trim")
|
| 6. |
Remove the center pillar trim.
(Refer to Body - "Center Pillar Trim")
|
| 7. |
Remove the floor cafet.
(Refer to Body - "Floor Carpet")
|
| 8. |
Disconnect the anchor pretensioner (A).
|
| 9. |
Loosen the monuting bolt and remove the anchor pretensioner.
|

| Installation |
| 1. |
Disconnect the negative (-) cable from battery and wait for at least
three minutes.
|
| 2. |
Install the EFD system with the mounting bolt.
|

| 3. |
Install the floor carpet.
|
| 4. |
Install the center pillar trim.
|
| 5. |
Install the rear door scuff trim.
|
| 6. |
Install the rear seat cushion.
|
| 7. |
Install the front seat.
|

| 8. |
Reconnect the battery negative cable.
|
| 9. |
After installing the EFD system, confirm proper system operation :
Turn the ignition switch ON; the SRS indicator light should turn on
for about six seconds and then go off.
|
 Seat Belt Pretensioner (BPT)
Components and components location
Components
1. Front Seat
Belt Pretensioner.
2. Rear Seat
Belt Pretensioner...
 Brake System
..
Other information:
Hyundai i30 (PD) 2018-2025 Service Manual: Description and operation
Description AVN system The AVN system has improved information search and easiness of manipulation for the driver by simplifying the system operation experience and unifying the display of the user information such as multimedia and car information...
Hyundai i30 (PD) 2018-2025 Service Manual: Rear Stabilizer Bar
Repair procedures Removal 1. Loosen the wheel nuts slightly. Raise the vehicle, and make sure it is securelysupported. 2. Remove the rear wheel and tire (A) from the rearhub...
Categories
- Manuals Home
- 3rd Generation i30 Owners Manual
- 3rd Generation i30 Service Manual
- Trip computer
- FCA sensor
- LKA system operation
- New on site
- Most important about car
Air bag - supplemental restraint system
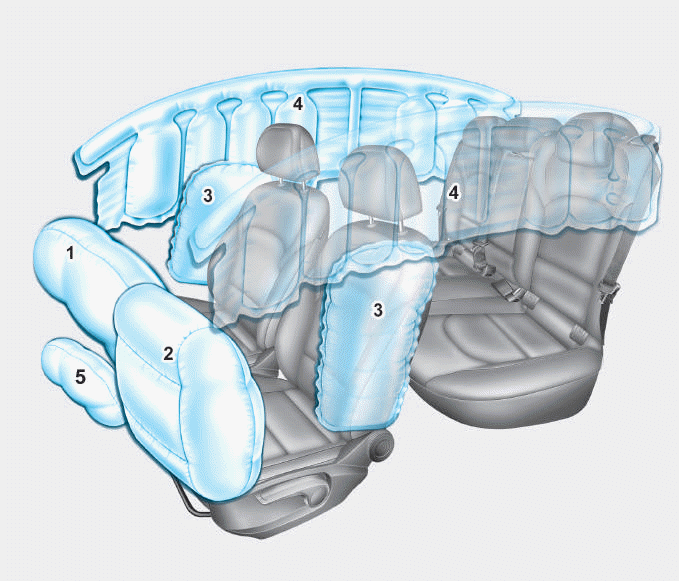
1. Driver’s front air bag
2. Passenger’s front air bag
3. Side air bag*
4. Curtain air bag*
5. Knee air bag*
6. Front passenger air bag ON/OFF
switch
Copyright © 2025 www.hi30.net