Hyundai i-30: Seats / Head restraint
The vehicle’s front and rear seats have adjustable head restraints. The head restraints provide comfort for passengers, but more importantly they are designed to help protect passengers from whiplash and other neck and spinal injuries during an accident, especially in a rear impact collision.
WARNING
To reduce the risk of serious injury or death in an accident, take the following precautions when adjusting your head restraints:
- Always properly adjust the head restraints for all passengers BEFORE starting the vehicle.
- NEVER let anyone ride in a seat with the head restraint removed.
 Adjust the
head restraints so
the middle of the head
restraint is at the same height
as the height of the top of the
eyes.
Adjust the
head restraints so
the middle of the head
restraint is at the same height
as the height of the top of the
eyes.- NEVER adjust the head restraint position of the driver’s seat when the vehicle is in motion.
- Adjust the head restraint as close to the passenger’s head as possible. Do not use a seat cushion that holds the body away from the seatback.
- Make sure the head restraint locks into position after adjusting it.
NOTICE
To prevent damage, NEVER hit or pull on the head restraints.
CAUTION
When there is no occupant in the rear seats, adjust the height of the head restraint to the lowest position. The rear seat head restraint can reduce the visibility of the rear area.
 Armrest, Carrying long/narrow cargo
Armrest
The armrest is located in the centre
of the rear seat. Pull the armrest
down from the seatback to use it.
Carrying long/narrow cargo
Additional cargo space is provided to
accommodate long/narrow cargo
(skis, poles, etc...
 Front seat head restraints
The driver’s and front passenger’s
seats are equipped with adjustable
head restraints for the passengers
safety and comfort.
Adjusting the height up and down
To raise the head restraint:
1...
Other information:
Hyundai i30 (PD) 2018-2025 Owner's Manual: Indicator lights
When the ignition switch is in the ON position, the ESC indicator light illuminates, then goes off if the ESC system is operating normally. The ESC indicator light blinks whenever the ESC is operating. If the ESC indicator light stays on, your vehicle may have a malfunction with the ESC system...
Hyundai i30 (PD) 2018-2025 Service Manual: Description and operation
Description and operation The System may be limited when • The radar sensor or camera is blocked with a foreign object or debris...
Categories
- Manuals Home
- 3rd Generation i30 Owners Manual
- 3rd Generation i30 Service Manual
- Exhaust System (DPF) Warning Light. Glow Indicator Light
- Shift-lock system. Shift-lock release
- Cruise control
- New on site
- Most important about car
Turn signals and lane change signals

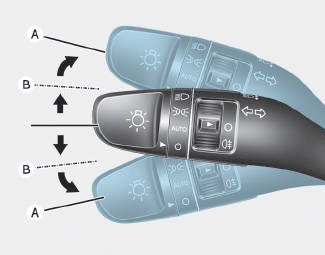
To signal a turn, push down on the lever for a left turn or up for a right turn in position (A). To signal a lane change, move the turn signal lever slightly and hold it in position (B).The lever will return to the OFF position when released or when the turn is completed.
